Beep-Sat (advanced)
Complete software example building upon 📻Beep-Sat (basic) with additional tasks, complexity, fault handling, and more.
Highlights
⭐ Builds upon core concepts from 📻Beep-Sat (basic) to yield a reliable a full-featured flight software example.
This example elaborates on four key aspects common to most small satellite missions:
- System-wide fault handling
- File management, data encoding, storage, and down-linking
- Low power (safe) mode
- Over-the-air commanding
Overview
This example is sufficient for actual real-world missions/applications.
- High-level fault handling is introduced to
main.pythat ensures the software will continue to run even if our tasks fail to complete (handling software AND hardware failures).Additionally, a "last resort" fail-safe is added that reboots the board in the event of catastrophic failure.
- Compact (bandwidth efficient) data logging is demonstrated using a modern data encoding format called MessagePack to easily store sensor data in files onboard an SD card.
(MessagePack is similar to JSON, but faster and smaller)
- Entering and exiting low power or "safe" mode in response to a low-battery condition.
- A reasonably-secure method for interacting with the spacecraft via over-the-air commands using the onboard radio. Four commands are demonstrated, 2 without arguments, 3 with arguments:
Without Arguments
no-opA "no operation" command. Doesn't do anything but respond with an acknowledgement (ACK) packet.
resetAllows remote reset of the board.
With Arguments
shutdownConclude the mission by remotely stopping all spacecraft activity
queryevaluate string argument as a single python expression and send return value
exec_cmdexecute string argument as entire python code block
Installation
- Download the latest Beep-Sat code from its GitHub Repo
(either download the zip or if you're familiar with git, fork & clone the repo)
- (Optional) With your PyCubed board plugged into your computer, backup your
PYCUBEDdrive by copying its contents to a directory on your computer.
- Copy the files from
/beepsat/advanced/to yourPYCUBEDdrive, overwriting any files when prompted
- Open a serial terminal and observe the output as the beep-sat conducts its mission
Refer to 🖱Accessing the Serial Console for help opening the REPL
Code Breakdown & Task Explanation
main.py
All changes to main.py pertain to fault handling and software robustness.
In the basic example, our state machine was initialized and ran (continuously) with the single call:
# should run forever
cubesat.tasko.run()
This is "risky" because ANY unhandled error/exception in any of our tasks would raise an exception within cubesat.tasko.run() and cause our entire flight software to stop.
- To address this, we wrap the
cubesat.tasko.run()call in atryandexceptcatch. Now if all else fails and we have an unhandled exception in any of our tasks, we'll attempt to log the exception before proceeding to our "fail-safe."try: # should run forever cubesat.tasko.run() except Exception as e: print('FATAL ERROR: {}'.format(e)) try: # increment our NVM error counter cubesat.c_state_err+=1 # try to log everything cubesat.log('{},{},{}'.format(e,cubesat.c_state_err,cubesat.c_boot)) except: passAlthough this is vital for the final "flight" software, it makes general software development and debugging much more difficult since any task-level exception is going to get abstracted up to this "FATAL ERROR" message without any additional helpful information (like where in the code we were when the exception was thrown, line numbers, etc...).
⚠️Therefore, for general software development use themain.pyfrom the basic example (or comment out everything we've just added) so you can benefit from the detailed REPL error messages when debugging.
- After the
tryandexceptcatch, we add our "fail-safe" which performs a hard reset of the board. This way, no matter what happens, we'll keep the spacecraft running (in some capacity).# we shouldn't be here! print('Engaging fail safe: hard reset') from time import sleep sleep(10) cubesat.micro.on_next_reset(cubesat.micro.RunMode.NORMAL) cubesat.micro.reset()This is considered a "nuclear" option and should only be treated as a last resort.
Although it provides a nice safety net, the goal is to never end up triggering the high-level fault handling shown here for main.py. But it is important to carry this try and except pattern into the individual tasks, thereby providing you with tools to handle targeted Exception behavior specific to the task. A good example of task-level Exception handling can be seen later in this tutorial for the beacon task.
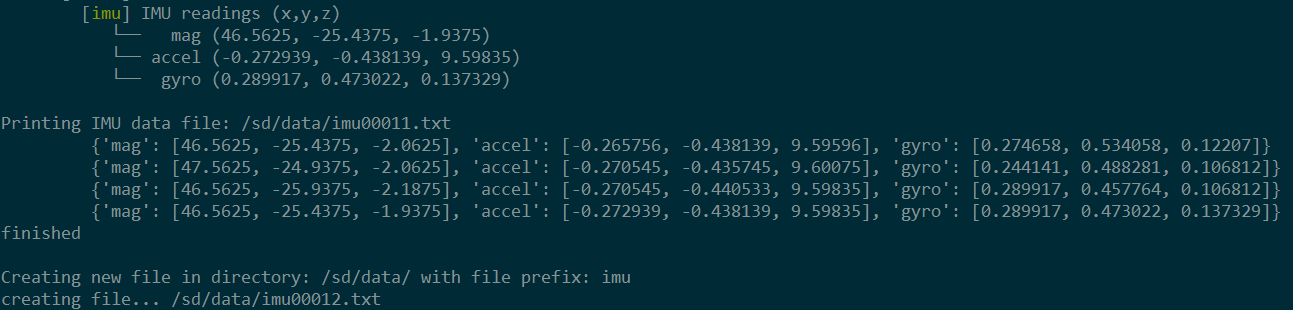
1. IMU data task
Beyond reporting the latest IMU readings, all changes to this task relate to file handling and data encoding. Note that any data encoding demonstrated here is purely optional. It's included in this example to illustrate how easy it is to work with binary-encoded data, which is very helpful for storage and transmission of mission data!
- With JSON, each IMU dataset would be 118 bytes, whereas it's only 64 bytes with
msgpackwithout any loss of data. Cool! This makes a big difference when down-linking data.
Preparing the data file
- First major code change we see to
imu_task.pyis the (re) definition of __init__:def __init__(self,satellite): super().__init__(satellite) self.data_file=self.cubesat.new_file('/data/imu',binary=True)We do this because we want to run something only one time
self.data_file = self.cubesat.new_file('/data/imu')and it must run before the primary IMU task itself. Usually we don't need to include this init statement since it's handled in the parentTaskclass.In order to perform whatever assignments and setup the
Taskclass usually handles during the init call, we usesuper().__init__(satellite)to inherit everything properly.Now what does this
cubesat.new_file('/data/imu',binary=True)call do?- Upon boot, we want to save our IMU data to a fresh data file. This avoids always appending to huge, hard to manage data files, as well as preventing any data loss by overwriting existing files.
- The
new_filehelper function takes the string we pass it and breaks it down into a folder/directory and file prefix.file prefix = everything after the last
/. In this case it'simu. The final file name becomes the prefix with an incremented zero-padded number tacked on (plus file extension). Like this:imu00000.txtfolder or directory = everything that isn't the file prefix. If the folders don't exist yet, they will be created.
/sd/is always appended to the beginning of the path!
- Therefore, each time we call
new_filelike this it will create a new (empty) file in the specified directory with a incremented file number:imu00000.txt→imu00001.txt→ etc...
- The
binary=Trueargument tells the function to create a new (empty) binary file. Since it's empty, this usually doesn't matter but it's good practice to be consistent so you don't try to open a binary file as text and throw an exception.
- Finally, the
new_filefunction returns the complete filename of the newly-created file. In our case the full filename becomes:/sd/data/imu00000.txt.
- For full details about this function, see the pycubed.py library file (either on your board or in its library repo)
- The next change to
imu_task.pycomes after printing our usual debug messages and we're ready to save our data:if self.data_file is not None:First thing we do is check that a data_file exists. If it doesn't, that means something went wrong trying to create the data file (like an SD card isn't present).
Encoding the data
Then we want to save the
readingsdict by encoding it withmsgpackand appending the binary data to our data file. Note thatmsgpackhas to write to a buffer object. This works out perfectly for writing to files (since we've opened the file as a buffer object already). See the CircuitPython msgpack docs for other examples.with open(self.data_file,'ab') as f: msgpack.pack(readings,f)What would this look like if we weren't using msgpack?
Imagine we want to write our
readingsdict to a file. We'll just treat the whole dictionary as a string and save it as a single line on the file. (not advised to treat dict as string! notice the data loss)with open(self.data_file,'a') as f: f.write(str(readings)+'\n')That's it! Our data is now saved to the file:
/sd/data/imu00000.txt.
- Next, we demonstrate checking file size, retrieving the encoded data from the file, and then either sending it using the radio or decoding it and printing to the terminal.
Performing
staton our datafile returns info about file. The index[6]contains the file size in bytes.if stat(self.data_file)[6] >= 256: # bytesWe only want to print/send the data once we have a certain amount. For the purposes of this demo, the amount is quite small in order to increase how often you get to see it occur in the debug terminal.
Sending the data
If the
SEND_DATAvariable (which you must manually set at the top of theimu_task.pyfile) is true, we can start reading and sending chunks of data:if SEND_DATA: with open(self.data_file,'rb') as f: chunk = f.read(64) # each IMU readings is 64 bytes when encoded while chunk: # we could send bigger chunks, radio packet can take 252 bytes self.cubesat.radio1.send(chunk) print(chunk) chunk = f.read(64)Since the
msgpackencoded data is 64 bytes each time we save IMU readings, we open the current data file (as binary) and keep reading until we've reached the end of the file. This works becausef.read(64)returns the number of bytes that were successfully read from the file. So even if we made a mistake somewhere and the size of the file isn't exactly a multiple of 64, it'll still return a non-zero value. Oncef.read(64)returns0, that's equivalent toFalsein Python so our while loop will terminate.We pass the
chunkobject toradio1.sendeach iteration through the while loop, and also print the raw bytes to the terminal. See the Going Further section of this write-up for receiving the transmitted data using another radio.Decoding and printing the data
If
SEND_DATAis false, we want to read chunks of data from the data file and decode them.else: # print the unpacked data from the file with open(self.data_file,'rb') as f: while True: try: print('\t',msgpack.unpack(f)) except: breakThis isn't immediately obvious, but
msgpack.unpacktakes a readable buffer as a input and spits out the decoded object. So each time we callunpackon our file objectf, it's going ingest bytes fromfuntil it reaches an end of a chunk (whichmsgpackis able to determine). We don't need to tell it how many bytes the encoded chunk should be, cool! We keep doing this until an exception is raised bymsgpack, presumably because it reached the end of the file (EOF). Either way, ourtry/exceptcatch breaks the while loop.
- Finally, we create a new (incremented) data file
self.data_file=self.cubesat.new_file('/data/imu')For this example, the next filename would be
/sd/data/imu00001.txt.
2. Battery voltage task
Previously, all we did in the battery_task.py task was print whether or not the battery voltage was below a threshold. Now we want to respond to a low battery condition.
- All changes to this task occur after our original printing of the battery voltage. First we see if the low batt condition is met.
If vbatt is below our desired threshold we set an NVM bit flag called
f_lowbatt. This flag will persist between power cycles, unplugging/plugging into your computer, etc...NOTE: See 📋PyCubed NVM Bit Map & Usage for more details about the NVM bit map.
self.cubesat.f_lowbatt=True
- Then we check the state of another NVM bit flag called
f_lowbtout:if self.cubesat.f_lowbtout: self.debug('lowbatt timeout flag set! skipping...') else:⭐This is a very important step!
We check if our low battery timeout flag has been set. This would be
Truein an instance where we've previously spent a long enough time in low power mode that something must be wrong. Rather than being stuck in low power mode for the remainder of our mission, we would set this flag if we want to SKIP entering low power mode ever again.While playing with this example (or developing your own), an easy way to clear bit flags is through the REPL:
>>> from pycubed import cubesat
>>> cubesat.f_lowbtout=False
or if you want to clear many flags at once, just set many of the NVM registers to
0at once:>>> from pycubed import cubesat >>> cubesat.micro.nvm[:50]=bytearray(50) # clear the first 50 NVM registers
- If the
f_lowbtoutflag is not set, we can proceed with entering low power mode.Start by calculating a time in the future that we should be out of low power mode before we reach it. This would be the current time (in seconds) + the maximum amount of time we should be in low power (
self.timeout). The result is our temporary_timervariable.Next, we
stopevery task we initialized when bootingmain.py:# stop all tasks for t in self.cubesat.scheduled_tasks: self.cubesat.scheduled_tasks[t].stop()Then we use a
pycubed.pyhelper function to either shutdown or sleep every sensor, radio, and peripheral on the board withself.cubesat.powermode('minimum').
- Now we reside in low power mode, sleeping for extended periods at a time to conserve power
while time.monotonic() < _timer:This while loop checks if the current time has exceeded our timeout time at the start of each iteration through the loop. This is more of a fail-safe to avoid getting stuck. We expect the timer check at the end of the loop to actually catch a timeout condition.
After calculating some amount of time to sleep (in this case it's 10% of our total timeout time) we sleep for that duration.
_sleeptime = self.timeout/10
time.sleep(_sleeptime)
After emerging from sleep, we calculate vbatt again and check if we're still below the threshold:
vbatt=self.cubesat.battery_voltage
if vbatt > self.cubesat.vlowbatt:
    self.debug('batteries above threshold',2)
    self.cubesat.f_lowbatt=False
    break
this
breakis what pulls us from the low power while loop.Otherwise, we check if we've exceeding our timeout time. If we have, that means something is wrong and we want to escape from low power mode by setting the
f_lowbtoutflag.if time.monotonic() > _timer: self.debug('low batt timeout!',2) # set timeout flag so we know to bypass self.cubesat.f_lowbtout = True
- Whether it's because the battery voltage has risen above our threshold or we've reached the timeout, we exit the low power
whileloop and need to turn everything back on and start our state machine again.self.cubesat.powermode('normal')will turn on or wake up all the sensors, radios, and other peripherals on the mainboard. We then pause for a few seconds as everything powers up before starting all of our state machine tasks again:# restart all tasks for t in self.cubesat.scheduled_tasks: self.cubesat.scheduled_tasks[t].start()This obviously assumes we want all the tasks running again. A change you might make here is only starting a subset of tasks (maybe indicated by an attribute of the
taskclass). Another option would be storing a list of task names that were running before entering low power, and only restarting those.
3. Beacon task
The listening portion of our beacon task is the perfect place to catch command packets from a ground station (for example). Note that attaching an antenna is required for the advanced features of this demo. See the antenna discussion as part of 📻Beep-Sat (basic) for more details.

- Recall that our radio library
pycubed_rfm9x.pyis an adaptation of the Adafruit libraryadafruit_rfm9x.py. This is important because it contains the basics of a popular radio library/scheme called RadioHead (RH). We haven't been exposed to it yet since the library does this behind the scenes, but it follows SOME RH conventions, such as the packet header.Four bytes get added to the front of every packet we send:
  1    2   3     4
[FROM][TO][ID][FLAGS]
This header is helpful in keeping track of messages, but is usually stripped from the front of a received packet so we don't have to see it.
We want to set the
[FROM]and[TO]designators in our task'sinitmethod:self.cubesat.radio1.node = 0xFA # our ID self.cubesat.radio1.destination = 0xAB # target's IDNote that the
nodeattribute refers to the[FROM]byte and thedestinationattribute is[TO]. The values of0xFAfor the spacecraft and0xABfor the ground station were just chosen arbitrarily for this example.
- Compared to the basic example, there is a modification to the
receivefunction that is very helpful when attempting to contact a spacecraft. It will ACK (acknowledge) and received packets addressed to it.⭐ The ACK is very helpful since it lets us know the spacecraft has received our message, regardless if the passcode and command are valid.
ACK functionality is enabled on the spacecraft side-of-things with:
response = self.cubesat.radio1.receive(keep_listening=True,with_ack=ANTENNA_ATTACHED)but it must also be enabled on the ground station side-of-things. See the Going Further section of this write-up for examples on how to send an addressed message and listen for an ACK.
Also note that we're using
ANTENNA_ATTACHEDfor double purpose here as way of settingwith_ackargument toTrueonly when there's an antenna attached.
- After the beaconing/listening activities described in the basic example, we now add our command handling.
For this demo, we only consider a command if the packet first contains our 4-byte "super secret code." This 4-byte passcode is not a very secure means of commanding the spacecraft, but it's sufficient for this demo. If the
super_secret_codeis correct, we then check for a command code, which we've chosen to be a 2-byte designator.Therefore, in order for the command packet to be valid, it needs to be at least 6 bytes long. So that is the first thing we check:
if len(response) >= 6:If the packet length is correct and we have an antenna attached, we proceed to verifying the
super_secret_codeand saving the two command bytes:if response[:4]==self.super_secret_code: cmd=bytes(response[4:6]) # [pass-code(4 bytes)] [cmd (2 bytes)]we also know that if the packet is longer than 6 bytes, then the command likely has arguments that follow.
if len(response) > 6:
   cmd_args=response[6:] # arguments are everything after
- The command needs to be verified and then the appropriate action can be executed.
Command dispatch
This advanced demo includes a new file called
cdh.py(cdh="command & data handling") that can reside in either the root of yourPYCUBEDdrive or its/lib/folder. We import this file at the top of ourbeacon_task.pyfile, thereby giving us access to dictionary inside calledcommandsas well as a handful of functions.We verify the received 2-byte command code by checking it against the keys inside the
cdh.commandsdict:if cmd in cdh.commands:inside the
cdh.pyfile, the actualcommandsdict looks like this:commands = { b'\x8eb': 'no-op', b'\xd4\x9f': 'hreset', b'\x12\x06': 'shutdown', b'8\x93': 'query', b'\x96\xa2': 'exec_cmd', }where the key is a 2-byte command code randomly generated for this demo, and the value is the command's "name" so to speak.
If the received command code matches a key in the
cdh.commandsdict, then we use the value of thatcdh.commandskey to retrieve the function from thecmd_dispatchdict initialized at the top of beacon task definition:cmd_dispatch = { 'no-op': cdh.noop, 'hreset': cdh.hreset, 'shutdown': cdh.shutdown, 'query': cdh.query, 'exec_cmd': cdh.exec_cmd, }note that the values for each dictionary item are functions that exist in
cdh.py. Accessing the values in this dict lets call the appropriate command while passing it whatever arguments we want. Sweet!Now all we have to do is dispatch the command:
if cmd in cdh.commands:
    try:
        if cmd_args is None:
            self.debug('running {} (no args)'.format(cdh.commands[cmd]))
            self.cmd_dispatch[cdh.commands[cmd]](self)
        else:
            self.debug('running {} (with args: {})'.format(cdh.commands[cmd],cmd_args))
            self.cmd_dispatch[cdh.commands[cmd]](self,cmd_args)
    except Exception as e:
        self.debug('something went wrong: {}'.format(e))
        self.cubesat.radio1.send(str(e).encode())
Notice how we wrap this command dispatch part in its own
tryandexceptcatch. That way if anything goes wrong, we transmit the error message back so we can (hopefully) troubleshoot what went wrong and whether it was the spacecraft's or ground station's fault.💡Using a dictionary as a function dispatcher is a powerful technique in Python. Make sure you understand howself.cmd_dispatch[cdh.commands[cmd]](self)actually works.It's important that we pass
selfas an argument to the command so that we have access not only to the beacontaskbut more importantly access to thecubesatobject. Now we can query and adjust anything remotely!
- Finally, whether a valid command was received and executed or not, the task still finishes by putting the radio to sleep with
self.cubesat.radio1.sleep().
Command Explanations
By this point, the no-op and reset commands from cdh.py should be fairly self explanatory.
Shutdown Command
For shutdown, we accept an additional argument as yet another level of verification before actually shutting the spacecraft down. In this case, another 4-byte passcode must match the one hard-coded into the function. Then it proceeds to stop all tasks and set the power mode to minimum (just like low power mode) before starting a never-ending sleep loop. This is pretty silly... What if we ever want to wake up? See the Going Further section for some suggestions on better options.
Query & Exec Commands
Now this is where things get REALLY cool (and dangerous 😈).
In Python, eval() and exec() are built-in functions that literally let you run a python program INSIDE your python program.
eval()evaluates the argument (which is a string) as a single Python expression and returns the value (if any) of the expression.
exec()executes the argument (also a string) as an entire block of Python code but doesn't return anything.
Therefore, you can think of eval() as typing individual python statements into the REPL and it returning the result and exec() as typing import FILENAME into the REPL and running all the code inside FILENAME.
This analogy holds pretty well, but there are some subtle exceptions. Research "Python3 eval vs exec" online to learn more.
In any case, with these two functions available to us over-the-air the possibilities are endless now that we can remotely execute any code we want. But with great power comes great responsibility! This also means we can quite easily crash our state machine if we're not careful.
Based on the definitions above, it's clear to see why our query command uses the eval function and sends the result as a string using the radio:
def query(self,args):
    self.debug('query: {}'.format(args))
    self.cubesat.radio1.send(data=str(eval(args)))
and the exec_cmd uses the exec function and doesn't send anything back over the radio.
See the relevant Going Further section for example usage of these commands.
eval and exec the over-the-air possibilities become ENDLESS. We can now remotely: change the value of a variable, upload new files, even edit the existing code files, just to name a few.This functionality will be discussed in greater detail at
🚀Over-the-air Updates (coming soon!)
Going Further
Receiving down-linked data
As discussed in the Going Further section of the 📻Beep-Sat (basic) example, we'll need another radio capable of transmitting a 433 MHz LoRa packet in order to receive any beacon or, in this case, down-link packets.
- Ensure you can successfully transmit a message to the beep-sat following these instructions from the basic example.
- If we can transmit a message to our beep-sat then we we can receive a down-link packet. All we need to do in ensure we're processing the received packets fast enough such that we don't miss any chunks of the file.
Below is example
main.pycode for down-linking beep-sat data for each of the previously described radio platforms.Second PyCubed board
from pycubed import cubesat

cubesat.radio1.ack_retries = 2
cubesat.radio1.ack_wait = 2
cubesat.radio1.node = 0xAB # this radio's radiohead ID
cubesat.radio1.destination = 0xFA # target sat's radiohead ID

while True:
    print(cubesat.radio1.receive(timeout=10))
Radio Breakout
import board
import busio
import digitalio
import pycubed_rfm9x

# Configure pins and SPI bus
CS= digitalio.DigitalInOut(board.D5)
RESET= digitalio.DigitalInOut(board.D6)
spi = busio.SPI(board.SCK, MOSI=board.MOSI, MISO=board.MISO)

# Initialize RFM radio
rfm9x = pycubed_rfm9x.RFM9x(spi,CS,RESET,433.0,code_rate=8,baudrate=1320000)
rfm9x.enable_crc=True
rfm9x.ack_retries = 2
rfm9x.ack_wait = 2
rfm9x.node = 0xAB # this radio's radiohead ID
rfm9x.destination = 0xFA # target sat's radiohead ID

while True:
    print(rfm9x.receive(timeout=10))
Combo board
import board
import busio
import digitalio
import pycubed_rfm9x
import time

# Configure pins and SPI bus
CS = digitalio.DigitalInOut(board.RFM9X_CS)
RESET = digitalio.DigitalInOut(board.RFM9X_RST)
spi = busio.SPI(board.SCK, MOSI=board.MOSI, MISO=board.MISO)

# Initialize RFM radio
rfm9x = pycubed_rfm9x.RFM9x(spi,CS,RESET,433.0,code_rate=8,baudrate=1320000)
rfm9x.enable_crc=True
rfm9x.ack_retries = 2
rfm9x.ack_wait = 2
rfm9x.node = 0xAB # this radio's radiohead ID
rfm9x.destination = 0xFA # target sat's radiohead ID

while True:
    print(rfm9x.receive(timeout=10))
Sending commands
Before attempting to receive ACKs or send commands, first confirm you can down-link data as discussed above. This verifies your hardware configurations are working properly.
Receiving an ACK
After properly initializing the hardware for your respective platform exactly as we did above:
- Note that setting the following attributes (as included in the software examples above) ensures we'll be able to request and receive ACK packets.
rfm9x.ack_retries = 2
rfm9x.ack_wait = 2
rfm9x.node = 0xAB # this radio's radiohead ID
rfm9x.destination = 0xFA # target sat's radiohead ID
We must set the
[FROM](aka rfm9x.node) and[TO](aka rfm9x.destination) attributes of the RadioHead header in order to trigger an ACK response from the spacecraft. The library is designed to not respond to ACK requests addressed to the default broadcast ID of0xFF.
- Next, since we know our beep-sat always listens right AFTER transmitting a beacon packet, we want our code to wait until it hears a beacon packet before transmitting a packet of its own:
while True:
    beacon=rfm9x.receive(timeout=10)
    if beacon is not None:
        ack = rfm9x.send_with_ack('Hi BeepSat!')
        print('received ACK?',ack)
This code runs forever listening for any received packet. If the beacon variable is not
Nonethen we received something (for this example we just assume the packet we receive is our beacon packet). So we immediately performrfm9x.send_with_ack(). It doesn't really matter what our message here says, just that we transmitted something with thesend_with_ackfunction. This function automatically requests an ACK from recipient as communicated in the radiohead[FLAG]header byte.
- The
send_with_ackfunction returns a boolean value indicating whether or not it received an ACK packet from the destination ID. We print this to the terminal to indicate whether or not we were successful in receiving an ACK.
Command & response examples
Once you can successfully receive an ACK as described above, then sending commands and listening for responses will be a piece of cake.
Below is example main.py code that makes it easy to send commands (using the proper command codes) and listens for responses for each of the previously described radio platforms.
Second PyCubed board
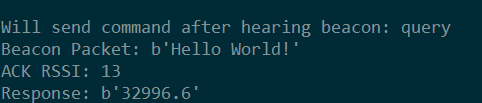
from pycubed import cubesat

cubesat.radio1.ack_retries = 2
cubesat.radio1.ack_wait = 2
cubesat.radio1.node = 0xAB # this radio's radiohead ID
cubesat.radio1.destination = 0xFA # target sat's radiohead ID

# create a command dictionary to make this easier
commands = {
    # command name : command code
    'no-op':b'\x8eb',       # does nothing
    'hreset':b'\xd4\x9f',   # hard reset
    ######## cmds with args ########
    'shutdown':b'\x12\x06', # shutdown sat
    'query':b'8\x93',       # eval
    'exec_cmd':b'\x96\xa2', # exec
}

# initialize cmd variable with default pass-code
cmd =  b'p\xba\xb8C'

# next specify cmd by editing the string below
CHOOSE_CMD = 'query'
print('\nWill send command after hearing beacon:',CHOOSE_CMD)

# then we add the cmd code for our chosen cmd string
cmd += commands[CHOOSE_CMD]

# finally we add any arguments (if necessary)
# P.S. we're doing it this way to illustrate each piece that goes into the cmd packet
if CHOOSE_CMD == 'shutdown':
    cmd += b'\x0b\xfdI\xec' # shutdown confirmation code
elif CHOOSE_CMD == 'query':
    cmd += b'time.monotonic()' # our query argument. try your own!
elif CHOOSE_CMD == 'exec_cmd':
    cmd += b'a=1\nprint(a)'

while True:
    response=rfm9x.receive(timeout=10)
    if response is not None:
        print('Beacon Packet:',response)
        ack = rfm9x.send_with_ack(cmd)
        if ack is not None:
            if ack: print('ACK RSSI:',rfm9x.last_rssi-137)
        # only listen for a response if we're expecting one
        if CHOOSE_CMD in ('shutdown','query','exec_cmd'):
            response=rfm9x.receive(timeout=10)
            if response is not None:
                print('Response:',response)
Radio Breakout
import board
import busio
import digitalio
import pycubed_rfm9x

# Configure pins and SPI bus
CS= digitalio.DigitalInOut(board.D5)
RESET= digitalio.DigitalInOut(board.D6)
spi = busio.SPI(board.SCK, MOSI=board.MOSI, MISO=board.MISO)

# Initialize RFM radio
rfm9x = pycubed_rfm9x.RFM9x(spi,CS,RESET,433.0,code_rate=8,baudrate=1320000)
rfm9x.enable_crc=True
rfm9x.ack_retries = 2
rfm9x.ack_wait = 2
rfm9x.node = 0xAB # this radio's radiohead ID
rfm9x.destination = 0xFA # target sat's radiohead ID

# create a command dictionary to make this easier
commands = {
    # command name : command code
    'no-op':b'\x8eb',       # does nothing
    'hreset':b'\xd4\x9f',   # hard reset
    ######## cmds with args ########
    'shutdown':b'\x12\x06', # shutdown sat
    'query':b'8\x93',       # eval
    'exec_cmd':b'\x96\xa2', # exec
}

# initialize cmd variable with default pass-code
cmd =  b'p\xba\xb8C'

# next specify cmd by editing the string below
CHOOSE_CMD = 'query'
print('\nWill send command after hearing beacon:',CHOOSE_CMD)

# then we add the cmd code for our chosen cmd string
cmd += commands[CHOOSE_CMD]

# finally we add any arguments (if necessary)
# P.S. we're doing it this way to illustrate each piece that goes into the cmd packet
if CHOOSE_CMD == 'shutdown':
    cmd += b'\x0b\xfdI\xec' # shutdown confirmation code
elif CHOOSE_CMD == 'query':
    cmd += b'time.monotonic()' # our query argument. try your own!
elif CHOOSE_CMD == 'exec_cmd':
    cmd += b'a=1\nprint(a)'

while True:
    response=rfm9x.receive(timeout=10)
    if response is not None:
        print('Beacon Packet:',response)
        ack = rfm9x.send_with_ack(cmd)
        if ack is not None:
            if ack: print('ACK RSSI:',rfm9x.last_rssi-137)
        # only listen for a response if we're expecting one
        if CHOOSE_CMD in ('shutdown','query','exec_cmd'):
            response=rfm9x.receive(timeout=10)
            if response is not None:
                print('Response:',response)# create a command dictionary to make this easier
Combo board
import board
import busio
import digitalio
import pycubed_rfm9x
import time

# Configure pins and SPI bus
CS = digitalio.DigitalInOut(board.RFM9X_CS)
RESET = digitalio.DigitalInOut(board.RFM9X_RST)
spi = busio.SPI(board.SCK, MOSI=board.MOSI, MISO=board.MISO)

# Initialize RFM radio
rfm9x = pycubed_rfm9x.RFM9x(spi,CS,RESET,433.0,code_rate=8,baudrate=1320000)
rfm9x.enable_crc=True
rfm9x.ack_retries = 2
rfm9x.ack_wait = 2
rfm9x.node = 0xAB # this radio's radiohead ID
rfm9x.destination = 0xFA # target sat's radiohead ID

commands = {
    # command name : command code
    'no-op':b'\x8eb',       # does nothing
    'hreset':b'\xd4\x9f',   # hard reset
    ######## cmds with args ########
    'shutdown':b'\x12\x06', # shutdown sat
    'query':b'8\x93',       # eval
    'exec_cmd':b'\x96\xa2', # exec
}

# initialize cmd variable with default pass-code
cmd =  b'p\xba\xb8C'

# next specify cmd by editing the string below
CHOOSE_CMD = 'query'
print('\nWill send command after hearing beacon:',CHOOSE_CMD)

# then we add the cmd code for our chosen cmd string
cmd += commands[CHOOSE_CMD]

# finally we add any arguments (if necessary)
# P.S. we're doing it this way to illustrate each piece that goes into the cmd packet
if CHOOSE_CMD == 'shutdown':
    cmd += b'\x0b\xfdI\xec' # shutdown confirmation code
elif CHOOSE_CMD == 'query':
    cmd += b'time.monotonic()' # our query argument. try your own!
elif CHOOSE_CMD == 'exec_cmd':
    cmd += b'a=1\nprint(a)'

while True:
    response=rfm9x.receive(timeout=10)
    if response is not None:
        print('Beacon Packet:',response)
        ack = rfm9x.send_with_ack(cmd)
        if ack is not None:
            if ack: print('ACK RSSI:',rfm9x.last_rssi-137)
        # only listen for a response if we're expecting one
        if CHOOSE_CMD in ('shutdown','query','exec_cmd'):
            response=rfm9x.receive(timeout=10)
            if response is not None:
                print('Response:',response)
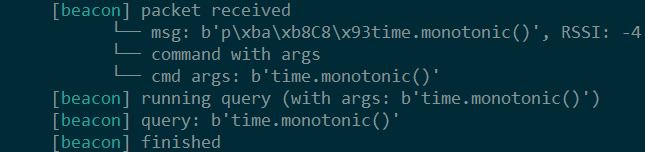
Upon running the secondary radio code 👆 while our example beep-sat code is running, you should see debug messages indicating the exchange was successful (make sure you have a terminal opened for the beep-sat as well as the secondary radio).
By default, the example code above sends a query command questing the beep-sat's current time. You can change what command you send by editing the CHOOSE_CMD = 'query' value. A successful exchange prints the following on their respective terminals:
Secondary radio:
Beep-Sat
Awesome! 🎉
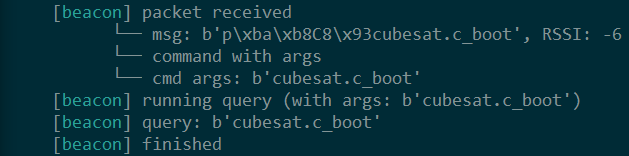
Now if we were to edit the query command argument in your main.py code to be b'cubesat.c_boot' (for example), we should receive a response containing how many times our mainboard has booted (recently):
Secondary radio:
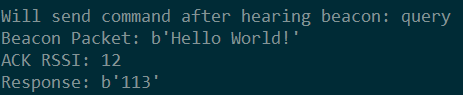
Beep-Sat
Now play around with the exec_cmd command and see what cool chaos you can cause. Don't forget: there are absolutely zero safety nets when using eval and exec commands in Python. But you wont break anything permanently, the code can always be restarted, so don't be afraid to try cool stuff!
This feature will be discussed in more detail in 🚀Over-the-air Updates (coming soon!).
Features to add yourself
Share it on the
💬 PyCubed Forums!
- A "listen again" flag settable when sending an over-the-air command
After playing with the command examples above, you'll quickly find yourself frustrated with having to wait 30s until the next beacon task before you can issue another command. This is because our beacon task is set up to stop listening after receiving a packet. Wouldn't it be nice if you could tell beep-sat to keep listening at the same time as you are sending it a command?
- One option is to use part of the RadioHead
[FLAG]byte. If you read through thepycubed_rfm9x.pylibrary, you'll find that the lower 4 bits of the[FLAG]byte can be used for whatever you want! Then you'd need to devise a way of checking these bits before the beacon task stops listening.Sounds like fun!
- One option is to use part of the RadioHead
- Even though having over-the-air access to
execis basically like having keys to castle, there are a handful of routine commands that would be useful to already have implemented incdh.py.A few that come to mind:
- A wake-up command to complement the shutdown command.
(This is also briefly mentioned in the task description above)
- Send the contents of our default
log.txtfile
- Delete one or more files
- Upload a file
Since we're limited to 252 bytes per radio packet, this should be able to create a new file and/or append to an existing file.
- CRC a file
If we're uploading files, we should also have a way of checking them. A cyclic redundant check (CRC) is one of many ways you could do this.
- A wake-up command to complement the shutdown command.
- When sending a file, each packet should include an index so you can tell if a packet was missed. (1 of 10, 2 of 10, etc...)
- and many many more 😇
We have a Beep-Sat “Advanced-2” example in the works that implements some of the above features as well as demonstrating deep sleep, rapid over-the-air commanding, and more! The flight software is available under the dev-advanced-2 branch of the PyCubed repo if you want to check it out. It’s fully functional but we’re still testing and refining.
Next Section →  Next Steps