Beep-Sat (basic)
Beep-Sat is a complete software example for a simple beaconing satellite that performs a handful of tasks and runs forever.
Highlights
⭐ Software architecture that is easy to understand & build-upon
A simple asynchronous state machine schedules and runs routine spacecraft tasks
- Each task definition is contained within a single plain-text file
- Task files are easily added, removed, or modified
⭐ Well documented code with real-time debug messages
Entire code base includes thorough in-line commentary & insight
- During operation, descriptive messages are printed to the USB serial terminal
- Helpful coding patterns are discussed and software decisions are justified
Overview
As introduced in ⚡Hands-On Quick Start, whenever a PyCubed board is powered, it loads and runs main.py from the board's root directory.
- For this Beep-Sat example, all
main.pydoes is automatically load each task file found within the/Tasks/directory into a state machine and then runs the state machine indefinitely.
- Each task file defines its
priorityandfrequencyattributes to inform the state machine how often to run the task.
- This demo relies on a lightweight asyncio library called Tasko to achieve pseudo-asynchronous behavior. But remember there are countless other ways of achieving this functionality!
Installation
- Download the latest Beep-Sat code from its GitHub Repo
(either download the zip or if you're familiar with git, fork & clone the repo)
- (Optional) With your PyCubed board plugged into your computer, backup your
PYCUBEDdrive by copying its contents to a directory on your computer.
- Copy the files from
/software_example_beepsat/basic/to yourPYCUBEDdrive, overwriting any files when prompted
- Open a serial terminal and observe the output as the beep-sat conducts its mission.
Refer to 🖱Accessing the Serial Console for help opening the REPL
- After observing the output in the terminal for a few moments, start working through understanding each task by stepping through the code breakdown discussion (below) while opening and playing with its respective file in
/Tasks/task_filename.py.
Required Hardware
- PyCubed Mainboard
Code Breakdown & Task Explanation
1. Blink LED task
Priority: 255
Frequency: twice per second (2 Hz)
Very simple task to blink the onboard RGB LED. With a priority of 255, Blink has a very low priority and will be preempted by most all other tasks.
2. Report IMU data task
This task demonstrates an important spacecraft function: how to perform routine sensor data collection over common serial buses such as I2C, SPI, or UART.

- Each time the task is called, we create a dictionary (dict) object and populate it readings from the onboard IMU.
readings = { 'accel':self.cubesat.acceleration, 'mag': self.cubesat.magnetic, 'gyro': self.cubesat.gyro, }- Although easy to understand, dynamically creating the
readingsdict every time we perform this task is not very memory-efficient. HOWEVER, CircuitPython's built-in "garbage collector" allows us to get away with things like this by automatically freeing memory when not needed.
- The reason we create a dictionary (rather than a list or tuple) to store the data is 3-fold:
- Show how to define and populate a dict
- Have a dict ready to pass to the
updatemethod we are about to perform
- Aid us in printing a well-formatted debug message containing our most recent IMU readings
- Each key in our dictionary (
accel,mag,gyro) corresponds to an IMU reading. The IMU reading is collected using theself.cubesat.accelerationmethod which is a helper method from thepycubed.pylibrary. Thepycubed.pyprovides streamlined access to many hardware features. It's advised PyCubed users thoroughly review and understand the ⭐pycubed.py library.In this case, this method uses the IMU-specific library to request acceleration data from the IMU via I2C.
- Although easy to understand, dynamically creating the
- Next, we
updateanother dict's existing key:value pair with our newly created readings variable.self.cubesat.data_cache.update({'imu':readings})- We update the
data_cachedict because it is accessible via theself.cubesatobject. This is useful because theself.cubesatobject can be accessed from ANY task.
updateis helpful because even if our data_cache dict doesn't have a key named "imu", it will create one and then update the values. It's also (relatively) fast since python uses hash matching for dicts.
- We update the
- Finally, we print the IMU readings by looping through the values of the newly updated "imu" key.
for imu_type in self.cubesat.data_cache['imu']: self.debug('{:>5} {}'.format(imu_type,self.cubesat.data_cache['imu'][imu_type]),2)- We know the value of the "imu" key is another dictionary, so we use a for loop to access the keys (which are strings) for easy printing
- We then format our debug message with some fancy alignment
{:>5}and use the key name to access its respective value from the dictionary.
- Passing a
2as the second statement to our debug message tells it to put it on the second "level" which gives us the easy-to-read drop down formatting.
3. Monitor battery voltage task
Simple task that measures the battery voltage and compares it against a threshold. This shows you how to monitor the battery voltage and respond if necessary.

- Start by using a pycubed.py helper function to measure the battery voltage and then store it as a variable called
vbatt:vbatt=self.cubesat.battery_voltage
- Compare our
vbattmeasurement to theself.cubesat.vlowbattvariable that was created when the board initialized. It's helpful to havevlowbattstored within thecubesatobject in case we ever want to change the threshold value (in another task perhaps) in response to something in our mission.if vbatt > self.cubesat.vlowbatt: comp_var = '>' else: comp_var = '<'- Update our variable called
comp_varwith the appropriate string
- In the 📻Beep-Sat (advanced) demo, after this
ifstatement is where we add important code to respond to a low battery condition.
- Update our variable called
- Finish by printing the measured value as it compares to the threshold.
If powered from the USB (as is the case for the above example), the measured 6.4V "battery voltage" is actually the voltage supplied by the USB charger.
4. Report time since boot task

This task demonstrates some basic timekeeping by calculating how long this instance of the beep-sat code has been running.
- Calculate time since boot
t_since_boot = time.monotonic() - self.cubesat.BOOTTIMEtime.monotonic()reports the time in seconds (float) since the PyCubed board was powered. This float will keep increasing until the board is power cycled or the microcontroller receives a hard-reset.
- Since the pycubed.py library logs the time that the software boots (stored as
cubesat.BOOTTIME, we can use that value to calculate how long this instance of the software has been running.
5. Transmit beacon packet & listen task
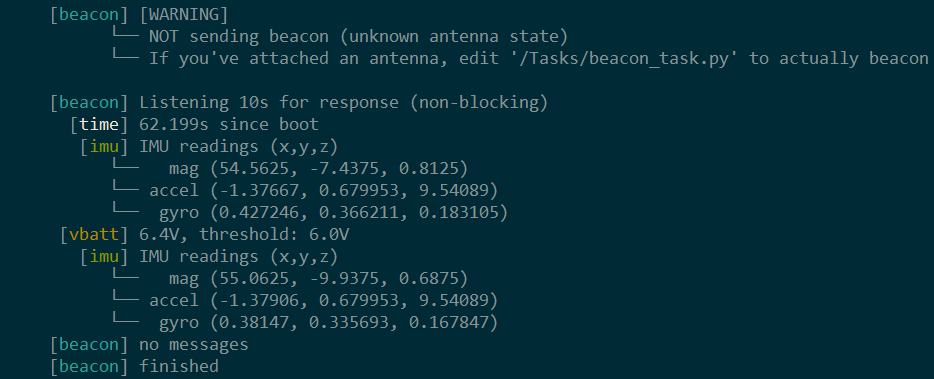
Therefore, the beacon task does not transmit a beacon by default. Transmitting can easily be enabled by editing the
/Tasks/beacon_task.py task file as described belowThis task demonstrates how to transmit a message (using the default LoRa modulation settings) and then asynchronously listen for a response for 10 seconds.
Default LoRa Modulation Settings: Frequency: 433 MHz, SF7, BW125kHz, CR4/8, Preamble=8, CRC=True
- Notice that before the main_task definition, we've set the attribute:
schedule_later = TrueThis is a built-in attribute (default=False) that tells the state machine to schedule the task for the first time after one frequency period has passed. So in this case, the beacon task will run for the first time at time=~30s.
- First thing the task does each time it's called is check whether
ANTENNA_ATTACHEDis true or false. Since theANTENNA_ATTACHEDvariable is local to the beacon task, this forces you to physically edit the file and set the value toTrueif you want the board to beacon.
(make sure you've attached an antenna before trying to beacon)
- If you've attached an antenna and edited the file accordingly, the board will transmit a beacon:
self.cubesat.radio1.send("Hello World!",keep_listening=True)using the onboard RFM98PW radio. Radio modules have a lot of functions! Below are some resources to learn more about hardware and software capabilities.
- Understand the software capabilities by reading through the radio library located on your board at:
/lib/pycubed_rfm9x.py
- Hardware capabilities of the radio can be found in the datasheet:
🗄Component Datasheets
- Radio examples in 🖥️Code Examples
- Understand the software capabilities by reading through the radio library located on your board at:
- Regardless if we actually beaconed, we now want the radio to listen for messages and notify the state machine (without blocking other tasks) if it hears anything.
heard_something = await self.cubesat.radio1.await_rx(timeout=10)⭐ this
awaitstatement is the key to listening for messages without blocking other tasks- the code located below
heard_somethingwill not run until the theawaitstatement returns. In the meantime, the code is able toyieldand go back to performing other tasks.
- we've built a timeout into the
await_rxradio function to prevent the software from continuously checking for messages forever.
Resources for understanding async behavior:
- The behavior is similar to Python's asyncio, but not exact!
- See the tasko library repo for more details
- the code located below
- The beacon code "resumes" once
heard_somethinghas a value:if heard_something: response = self.cubesat.radio1.receive(keep_listening=False) if response is not None: self.debug("packet received") self.debug('msg: {}, RSSI: {}'.format(response,self.cubesat.radio1.last_rssi-137),2) self.cubesat.c_gs_resp+=1 else: self.debug('no messages') self.cubesat.radio1.sleep()- if
heard_somethingisTrue, that meansawait_rxhas returned because the radio has received a message. So we retrieve the message, store it asresponse, and print it. We also increment our "response counter" register so we know how many times we've heard something.
Any responses during our listening period are printed to the terminal. The "RSSI" value is a relative measure of signal strength.
heard_somethingisFalsewhenawait_rxtimes out without receiving any messages
P.S. This region of the code is where we implement over-the-air commands in the advanced example: 📻Beep-Sat (advanced)
- if
- Finally, whether we've received a message or not, we put the radio to sleep before ending this iteration of the task:
self.cubesat.radio1.sleep()
Going Further
Creating your own task
Adding a new task to the state machine is as simple adding a task file to the Tasks directory!
- Start by copying and pasting the
/Tasks/test_task.pyfile into the same directory and renaming it to something like "demo.py". The file name doesn't need to have "task" in it.
- Edit your new
/Tasks/demo.pyfileAll task files follow a pattern inherited from
/Tasks/template_task.py. Review the template file for specifics on the default class definitions. But to paraphrase:- The
taskclass we create in each task file inherits default methods and attributes from the template class.
- By redefining an attribute such as
frequencyorprioritywe are overwriting the default values.
- Set
schedule_later = Truein your demo task to tell the state machine to schedule the task for the first time after one frequency period has passed. In other words: skip just the first iteration of the task.
- Review
/lib/debugcolor.pyto see what colors you can choose from for your task debug messages. You can certainly add your own as well!
- The
Receiving beacon packets and responding
An aspect of the Beacon Task discussed above involves listening for messages. But how can we transmit a message that our Beep-Sat will receive?
First we'll need another radio capable of transmitting a 433 MHz LoRa packet.
Here are some options that are also programmable in CircuitPython:
- Another PyCubed board
- A radio breakout board driven by a dev board (like a feather M4)
- A dev board + radio combination board (like this radiofruit board)
Below are some basic instructions for transmitting a messaging using each of the above options:
Second PyCubed board
If we're fortunate enough to have a second PyCubed board, the task of sending a message to our Beep-Sat is very simple.
- With an antenna attached, plug the second PyCubed board into a computer (doesn't need to be the same computer as the one powering the Beep-Sat)
- Start the REPL for the second PyCubed board and enter the following:
>>> from pycubed import cubesat
>>> cubesat.radio1.send('Hi BeepSat!')
Don't forget to time sending the second command with the 10s listening window.
- The Beep-Sat should receive the message if it was transmitted during a listening window. You'll see a debug message similar to this one.
- That's it! Since we're using the default PyCubed LoRa parameters, we didn't need to do any additional configuring of the radio beyond what was performed during the initialization.
Radio breakout
Before you can use a radio breakout like these you'll need to solder headers, wires attaching at least CS and RST lines to pins, and at least a wire antenna. This breakout will then plug into a dev board (like a feather M4).
Everything is covered in Adafruit's excellent write-up:
https://learn.adafruit.com/radio-featherwing- As you work your way through the above Adafruit tutorial 👆, follow the instructions for CircuitPython (as opposed to Arduino).
- After completing the tutorial, create a main.py file containing the following
import board, busio, digitalio
import pycubed_rfm9x

# Configure pins and SPI bus
CS= digitalio.DigitalInOut(board.D5)
RESET= digitalio.DigitalInOut(board.D6)
spi = busio.SPI(board.SCK, MOSI=board.MOSI, MISO=board.MISO)

# Initialize RFM radio
rfm9x = pycubed_rfm9x.RFM9x(spi,CS,RESET,433.0,code_rate=8,baudrate=1320000)
rfm9x.enable_crc=True

rfm9x.send('Hi BeepSat!')
- Save the above file, then you can use the REPL or power cycle the board in order to restart the board
- The above code will initialize the board and then transmit the message, so make sure to time it appropriately with the Beep-Sat.
- The Beep-Sat should receive the message if it was transmitted during a listening window. You'll see a debug message similar to this one.
Combo board
This board won't have CircuitPython or the UF2 bootloader installed yet. But that's an easy fix!
Follow these instructions: https://learn.adafruit.com/installing-circuitpython-on-samd21-boards
- Make sure you're able to plug your M0 board in and reach the REPL
- Follow the instructions above for the breakout board. You'll just need to solder antenna.
import board
import busio
import digitalio
import pycubed_rfm9x
import time

# Configure pins and SPI bus
CS = digitalio.DigitalInOut(board.RFM9X_CS)
RESET = digitalio.DigitalInOut(board.RFM9X_RST)
spi = busio.SPI(board.SCK, MOSI=board.MOSI, MISO=board.MISO)

# Initialize RFM radio
rfm9x = pycubed_rfm9x.RFM9x(spi,CS,RESET,433.0,code_rate=8,baudrate=1320000)
rfm9x.enable_crc=True

rfm9x.send('Hi BeepSat!')
See 🖥️Code Examples for more radio examples.
Advanced features
The 📻Beep-Sat (advanced) demo builds upon what is established here by adding more hardware functionality, improved fault tolerance, over-the-air commanding, and more!
Next Section → 📻Beep-Sat (advanced)